How to automate Toggl Track (4 simple steps).
Clockk • March 9, 2023
Toggl track’s biggest flaw is that you need to start and stop a timer to track your time. Timers are easy to forget, which leaves you with inaccurate data. On the other hand, if you do remember the timer, it disrupts your workflow. Free yourself of the start/stop timer by using Clockk to automate your time tracking.
This guide will show you how to automate Toggl Track with Clockk in just 4 simple steps.
Clockk automatically tracks what you what you worked on and for how long. Continue to use Toggl Track and eliminate the worst part - remember to start/stop a timer.
- Seamlessly jump from project to project
- Remember what you worked on
- Focus on your work
- Bill accurately
- Improve productivity
How to automate Toggl Track
-
Sign up for Clockk HERE by providing your email address and creating a password.
-
Once you sign up, install the two private and secure trackers: The desktop app and browser extension. (Email and calendar are optional).

- Continue to work normally and the next day you will receive an email that looks like the picture below. You can also view this email with more detail in the Clockk App under List view or view your work grouped by project in Clockk's Activity view

- Log into Toggl Track and add in your time.
-
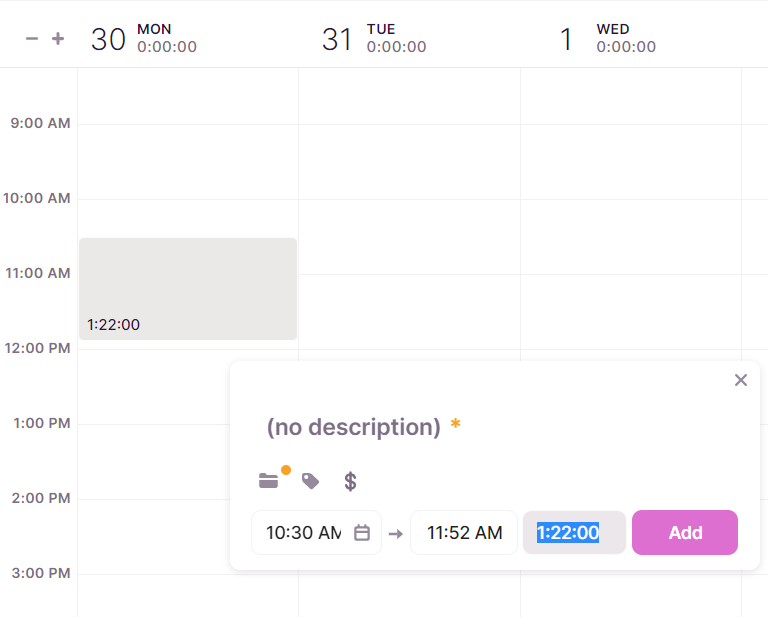
If you want to add in 1h22m (from Google Docs in the email shown above) click and drag on the calendar in the Toggl Track web app under the date you want to add your time for.
-
Enter 1h22m into the box that pops up, pick the project that it's for, add a description, and hit add!
*It doesn't matter how large you drag the box, once you add in your time it will adjust.
Ready to save time and find unbilled hours? Get Started